Desmontar llanta delantera
Estos dias hare la primera prueba de reparacion de las llantas asi que aprovecho para poner info. de la pagina de Bare sobre como desmontar la llanta delantera.
Preface
This is a basic walk-through for removing/installing the front wheel on the VTX 1300C. This is a pretty simple job which requires a few basic tools and a torque wrench if you have a decent walk-through - I hope to remedy that last part with this. As always undertake this project at your own risk, but with a little common sense this isn't very hard to do at all.
Preparation/supplies
 Motorcycle lift
Torque wrench capable of 16 to 43 ft/lbs of torque
Deadblow hammer or hammer and block of wood
6mm, 17mm allen socket
7/8" OR 22mm socket
Removal
Raise the bike on the lift and block the back wheel with something so the bike won't rock off the lift when the front wheel comes off.
Use a 6mm allen socket to break loose the pinch bolts on the RIGHT side only.

With those pinch bolts broken loose you can use the 7/8" or 22mm socket to loosen and remove the axle bolt.
With the right side taken care of break the left side pinch bolts loose and remove the axle altogether. You may need a rod or broomstick of some sort to drive the axle out.
With the axle out the wheel will fall out so be ready!!!
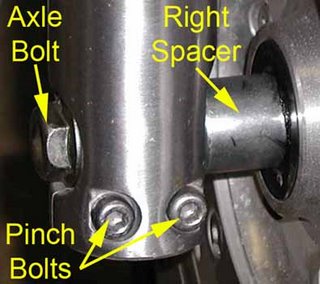 With the wheel out remove and inspect the spacers, take note that they are different sizes (right bigger than left). I usually put my axle and the spacers back together so nothing gets lost while I swap tires, etc. This is from an 1800 but it'll give you the idea of what I mean so nothing gets lost.

While everything is broken down do some inspection to make sure you're riding safe - check the axle, bearings, dust seals, bolts, etc. If anything seems worn or faulty then replace it - is your life/safety really worth a $.50 bolt or a $15 bearing?
Intermission...
Now is the portion of the write-up when you do whatever you were removing the wheel for in the first place...
With the axle/groove in place tighten the pinch bolts on the left side only to 16 ft/lbs.
Now put the axle bolt back in on the right side and torque it to 43 ft/lbs. If for any reason the axle slips in the left pinch bolts you can hold it with a 17mm allen socket (same size that the swingarm uses).
With the axle bolt torqued in place you can tighten the right side pinch bolts to 16 ft/lbs.
That's it, you're done!
Afterthoughts
This is a fairly easy job for most riders to do and it can cut your tire changing costs in half. More money = more chrome and that's a good thing!
Esto fue gracias a Bare's VTX Page!!
Preface
This is a basic walk-through for removing/installing the front wheel on the VTX 1300C. This is a pretty simple job which requires a few basic tools and a torque wrench if you have a decent walk-through - I hope to remedy that last part with this. As always undertake this project at your own risk, but with a little common sense this isn't very hard to do at all.
Preparation/supplies
Motorcycle liftTorque wrench capable of 16 to 43 ft/lbs of torqueDeadblow hammer or hammer and block of wood6mm, 17mm allen socket7/8" OR 22mm socketRemoval
Raise the bike on the lift and block the back wheel with something so the bike won't rock off the lift when the front wheel comes off.
Use a 6mm allen socket to break loose the pinch bolts on the RIGHT side only.

With those pinch bolts broken loose you can use the 7/8" or 22mm socket to loosen and remove the axle bolt.
With the right side taken care of break the left side pinch bolts loose and remove the axle altogether. You may need a rod or broomstick of some sort to drive the axle out.
With the axle out the wheel will fall out so be ready!!!
 With the wheel out remove and inspect the spacers, take note that they are different sizes (right bigger than left). I usually put my axle and the spacers back together so nothing gets lost while I swap tires, etc. This is from an 1800 but it'll give you the idea of what I mean so nothing gets lost.
While everything is broken down do some inspection to make sure you're riding safe - check the axle, bearings, dust seals, bolts, etc. If anything seems worn or faulty then replace it - is your life/safety really worth a $.50 bolt or a $15 bearing?
Now is the portion of the write-up when you do whatever you were removing the wheel for in the first place...
Install
This is pretty much the reverse of what we just did to remove the wheel. If for any reason the rotor needed to be removed (some shops will remove it to swap tires) make sure that it is reinstalled with red loctite and torqued to 31 ft/lbs. The manual doesn't mention loctite on these bolts because they "require" replacement and new bolts come with the loctite on them. If your bolts look fine then they should be ok to re-use (with loctite). If you don't feel comfortable re-using then replace them, they are metric bolts available from HOP.
Now put your wheel spacers back on properly (right bigger than left) and lift the wheel into place. When getting it into place you have to get the rotor inserted back into the brake caliper properly. The pic below is of an 1800 caliper but the idea is still the same - get the rotor into the caliper between the 2 brake pads. Since it's not necessary to remove the caliper just make sure it lines up properly as you lift the wheel back into place.
This is pretty much the reverse of what we just did to remove the wheel. If for any reason the
 rotor needed to be removed (some shops will remove it to swap tires) make sure that it is reinstalled with red loctite and torqued to 31 ft/lbs. The manual doesn't mention loctite on these bolts because they "require" replacement and new bolts come with the loctite on them. If your bolts look fine then they should be ok to re-use (with loctite). If you don't feel comfortable re-using then replace them, they are metric bolts available from HOP.
Now put your wheel spacers back on properly (right bigger than left) and lift the wheel into place. When getting it into place you have to get the rotor inserted back into the brake caliper properly. The pic below is of an 1800 caliper but the idea is still the same - get the rotor into the caliper between the 2 brake pads. Since it's not necessary to remove the caliper just make sure it lines up properly as you lift the wheel back into place.
With the tire in place and the rotor inserted into the ca liper get the axle started through the rim and use a deadblow hammer or a hammer and block of wood to drive it through. If you look at the axle you will see a small groove on the left side where it seats into the fork leg. You want to drive the axle in until that groove is flush with the edge of the indent on the fork leg. It should look just like the picture - you will see the groove with the axle out and it should help you better
  understand.
 liper get the axle started through the rim and use a deadblow hammer or a hammer and block of wood to drive it through. If you look at the axle you will see a small groove on the left side where it seats into the fork leg. You want to drive the axle in until that groove is flush with the edge of the indent on the fork leg. It should look just like the picture - you will see the groove with the axle out and it should help you better
  understand.
With the axle/groove in place tighten the pinch bolts on the left side
 only to 16 ft/lbs.
Now put the axle bolt back in on the right side and torque it to 43 ft/lbs. If for any reason the axle slips in the left pinch bolts you can hold it with a 17mm allen socket (same size that the swingarm uses).
With the axle bolt torqued in place you can tighten the right side pinch bolts to 16 ft/lbs.
Afterthoughts
This is a fairly easy job for most riders to do and it can cut your tire changing costs in half. More money = more chrome and that's a good thing!
Esto fue gracias a Bare's VTX Page!!
posted by VTX at 7:40 AM
![]()

0 Comments:
Post a Comment
<< Home