Saturday, December 20, 2008

Cambio de Aceite de Motor

Muchos recomiendan cambio cada 3,000 millas, yo lo cambio cuando sucede eso o una vez al año, depende del aceite que le este poniendo. Hay una gran cantidad de recomendaciones en cuanto a Aceite se refiere, pero en resumen, con solo que no sea "energy conservation" o algo asi y con las recomendaciones de SAE del proveedor estaremos bien. En lo personal busco Aceite Sintetico pues conserva mas las propiedades cuando ocurren cambios bruscos de temperatura. En fin. Publico esto en caso no encuentre otra pagina. Esto fue tomado de Bare`s VTX Page, se encuentra en los favoritos de este blog.

Preface
This is a basic walk-through for changing the oil on the VTX 1800. I have to say thanks to David from the VTXOA for snapping these pics and doing the initial write-up which served as a template for this write-up.
This is a simple job which only requires a few basic tools. As always undertake this project at your own risk, but with a little common sense this isn't very hard to do. I hope this helps.

Preparation/supplies
2 new crush washers available from HDL
Torque wrench capable of 20ft/lbs to 22 ft/lbs
17mm socket
Strap wrench or oil filter socket
Funnel
Drain pan (whatever your choice is for draining oil into)
New filter - I run the OEM ones
3.9 qts of your favorite oil

Process
I always start my oil changes with a quick trip around the block. I ride for about 2-3 minutes just to get the engine oil warmed up and moving. By doing this I get all the "junk" that settles in the motor mixed into the oil so that when I drain it comes out too. Plus warm oil flows better than cold oil so it should drain faster. I try to get my tools together before I make this trip so that as soon as I get back I can drain almost immediately. I know a couple of minutes won't make a huge difference, but I'm pretty anal about getting the old oil and as much "junk" out of the motor as possible.
So once I take my little trip I get my bike up on my "oil change blocks".


You can check these out over on my tools page.

Anyways, I use my motorcycle lift to raise the bike onto these blocks for oil changes, it's not as hard as it sounds and it makes changing the oil SO MUCH EASIER (no more busted knuckles)! Some people have made their own versions of these with the front end of the blocks cut on an angle so they can drive the bike right onto the blocks, and some people feel more comfortable changing the oil with the bike on the ground. I prefer my method but to each their own!
So with the bike ready to drain slide the drain pan under the bike, unscrew the dipstick (to allow air in as oil drains):


and remove the rear drain bolt with the 17mm socket:


Now we wait... While the oil is draining check out the crush washer on the drain bolt. If there is no washer there it may have fallen into the oil, unless you plan to replace it then fish it out of the drain pan. Give it a close inspection, make sure there are no big nicks or flaws in it. The service manual recommends replacing these with each oil change but if they still look ok then there's no reason you can't re-use it. If there is any doubt about the condition of the washer replace it, your safety isn't worth the $.50 or so to replace it.


I try to keep some of these on hand just in case I find myself needing to replace one at night or on a Sunday when I can't get one. I will say that in a pinch I have been able to find a replacement at the 24 hour AutoZone near my house, I just brought in the original for comparison - but they charged me an arm and a leg for it!
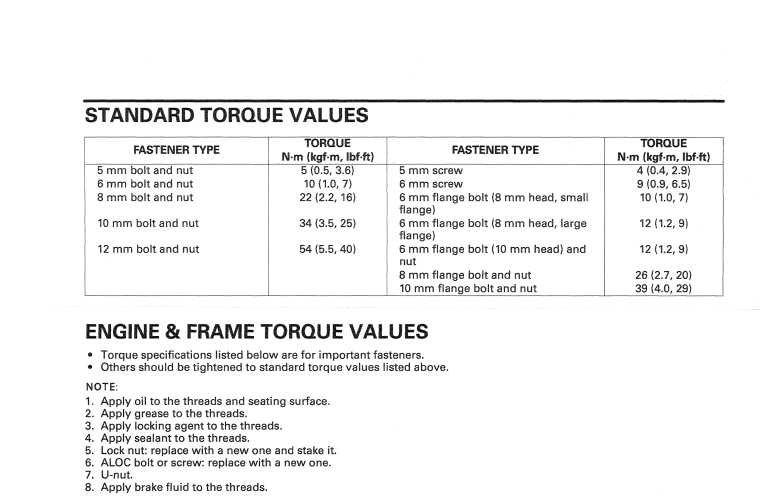
When the oil stops flowing from the rear drain replace the bolt and washer and tighten them to 22 ft/lbs.
Now move onto the front drain bolt:


Do the exact same thing for this one - remove, drain, inspect the washer, replace to 22 ft/lbs.
Now move back to the oil filter:


Use your filter socket, strap wrench, hand, whatever to remove the old filter. Sometimes they get a little stuck (this is especially true for bikes on the first oil change) so if worse comes to worse just punch a screwdriver through the filter (you're throwing it away anyway) and use that to unscrew it. With the filter removed let the remaining oil drain and check to make sure the gasket came off with the filter. Sometimes the rubber gasket on the old filter will stick to the engine case, installing the new filter over it can potentially leak - or worse drain all the oil suddenly in a worst case scenario. It's not a bad idea to check the old filter and visually inspect the engine case before installing the new filter.
Take a drop of new oil and coat the gasket on the new filter then thread it back onto the engine. Make sure you don't cross-thread the filter, it should spin right on with almost no resistance. The specific torque for the filter is 20 ft/lbs but I just seat the filter on the engine and snug it another 1/2 turn or so and I've never had a problem.

With the filter replaced and the 2 drain bolts/washers checked and torqued down we are now ready to add our 3.9 quarts of oil. Oil is a very personal choice so you can decide on what you want to run, I run Amsoil 10W-40 in my bike. If you want to try Amsoil you can order it from David Vain who is an outstanding dealer to work with. You can contact him at synthetics@vainenterprises.com or call him at 985-788-0554. If you're uncertain about your oil decision then maybe you should read Tapper's big oil article, it has given me a wealth of information regarding oil from someone who's done his homework.

Anyways, using the funnel dump all 4 quarts in quickly, pouring but not allowing the bottle to sit upside down and drain every little bit. After pouring all 4 quarts this way there is about .1 quart left between all 4 bottles so you added the required 3.9 quarts. There is some debate/discrepancy between folks about the proper method to refill the bike, this has led to some folks putting 5 and 6 quarts of oil into a bike that only requires the 3.9. What I've learned from working on these bikes is that the sticks in these bikes can vary slightly from bike to bike, how they read, how you lean when you check the stick, how much oil has drained down, etc - no matter how much you try to replicate the same conditions (run time, cool down time, etc) there are always discrepancies. So I add my 4 "fast-poured" quarts to the engine and then I pour the leftover old oil back into the 4, now empty, quart bottles. This makes it easy for me to deliver the oil for recycling AND it lets me know how much I drained. This way I can always make sure I'm replacing as much as I'm removing AND it lets me see if the motor is burning a little oil. After a few changes you know what to expect and if anything is off you'll recognize it. I never look at a dipstick unless the oil drained/replaced are dramatically different.

If your a strictly "by the book" kind of person and you absolutely have to check the dipstick then:
Start the engine and let it idle for 3-5 minutes
Stop the engine, let the bike sit for 2-3 minutes
Make sure the bike is on a level surface
Remove the dipstick and wipe it clean
Stand the bike upright off the sidestand
Insert the dipstick until it seats, but don't screw it in
Remove the dipstick and check the level

If you decide to use the "book" method please keep in mind what I've mentioned above. I am generally ALWAYS a "by the book" kind of guy when working on these things, but this is one time when I trust my real world experience over what the book says.

That's it - you're done - congratulations!


Afterthoughts
This is a relatively simple process that even the most inexperienced rider can do with the right tools. It will make you feel more comfortable and knowledgable about your bike, you know it's getting serviced right, and you don't pay the highway robbery prices of the stealership for a simple oil change. As with all these DIY projects, the money you save can be spent on more accessories!

Labels:

Wednesday, September 19, 2007

Cambiando el Coolant

Es necesario cambiar el coolant del sistema de enfriamiento cada dos años. Para preservar la valvula de agua y todo el sistema en si. Asi que ahi van unas cuantas especificaciones y mis aportaciones.

Procedure goes something like this - Remove the seat, tank, left side cover and left engine cover. Remove the radiator cap and (with a drain pan underneath) remove the drain bolt. (It is the one closest to 6:00 on the Water Pump - the only one with a washer beneath it.) Hold the bike upright so it all drains. I flushed it by pouring a little fresh coolant through. Clean off the drain bolt and re-install (9 lb-ft) with a new sealing washer (PN #90463-ML7-000). I took the reserve tank right off the bike by removing the red siphon hose (bottom of tank), and the plastic filler neck. Remove the bolt and it slides right out with the other two hoses still attached. Dump the old stuff out, clean it up nice, and re-install.
Here is the tricky part - refill the system (Honda HP coolant) and start the bike . You need to do this with the gas tank off and the cap off the cooling sytsem. I have a gas can with attached fuel line so I can run the bike with the tank off. Let it run for two or 3 minutes. Blip the throttle to purge any air from the system, you will see that the thermostat opened when the coolant starts to flow. Top off the coolant (bike upright) and install rad cap - dont forget the refill the reserve tank as well. Button everything back up and go ride.

Thats it - your cooling system is protected for another 2 years.
-Ceetro

Ahora unos cuantos tips e imagenes:

OJO que el coolant debe ser libre de silicatos. Es por eso que se recomienda usar el que vende Honda. Ese ya esta premesclado y no hay necesidad de la mezcla con agua destilada. Sin embargo en mi pais no habia y mucho costaba traerla asi que decidi usar el de Prestone de tapadera anaranjada (Dex-Cool). y lo mezcle con agua desmineralizada. Ojo que hay que evacuar todo el anterior, del sistema y de la reserva.

Por lo general es bastante facil excepto por lo del tanque de gasolina. Algo asi fue lo que hice para poder encender la moto por 3 minutos para poder evacuar el aire del sistema.


Y este es la tuerca que hay que aflojar, la cual en el manual esta en otra posicion, es decir, el manual esta equivocado.


Y ya, el sistema esta protegido por otros dos años. :)

Labels: , , ,

Ajuste de valvulas

El primer error que hice fue dejar que el taller hiciera el ajuste de valvulas. Claro, primero intente hacerlo por mi mismo pero cuando vi el espacio que tenia para operar, me di por vencido, Gran Error!!!. Despues que me la devolvieron estos fueron los sintomas:
Mas aire en el sistema, mas ploc ploc y back fire.
Cuando salia rapido el motor no respondia, tuve 3 encuentros cercanos de esta manera.

Cuando vi que mi vida corria peligro y despues de hacer un poco de tiempo, decidi volverla a llevar para reclamarles, y la vieron de mala gana. En la segunda vez los sintomas fueron estos:
Siguen los ploc ploc del escape
Ritmo irregular del motor
Se apagaba cuando el motor estaba idle.

Asi que decidi apartar tiempo y le meti mano. Primero publico el material que ya esta en linea y despues agrego unas cuantas imagenes que pueden ser de ayuda.

Pick a nice spot and get the bike up on a stand. This is optional, you can do it in the driveway just as well, but I prefer to have the bike straight and the added height makes it easier on the old back. Engine must be stone cold!!! You cannot properly check / adjust the valves on a hot bike. Should set overnight or several hours without running. Service manual calls for engine to be below 95º F.
Secure the forks so they don’t swing around and bash your tank when you remove it. I used some ratcheting tie downs (not too tight!) but bungees or rope would work as well.

Unhook the green speedo connections behind the right front plug cover. Remove the gas line and vacuum hose from the tank valve. Remove the seat and tank bolt, then lift the tank and remove the vent hose under the bottom right corner. Lift the tank up, then slide it back and off. Set the tank safely out of the way on 2 pieces of 2 x 4 so the valve won’t be mashed on the floor.

Con estos cables que van al panel del tanque, tengan cuidado ya que toda la cubierta pertenece a un lado y solo lo que sale de la cubierta pertenece al otro, asi que tienen que agarrar el extremo y levantar la pestana de seguridad. Es muy fragil asi que es probable que se rompa. Tengan cuidado.

You will have to remove the PAIR valve bracket and hose to slide it out of the way. Remove the timing hole cover and timing hole cap to view the index marks
Hay que remover el pair valve bracket para dejar mas espacio al trabajar en las valvulas traseras. La tapadera que ven abajo para poder rotar el motor y hacerlo llegar al FW o RW para poder ajustar las valvulas.

The timing cap is located beneath the shiny plasti-chrome timing cover. Remove it
Una vez se lo quiten se ve algo asi (al inicio no sabia donde diablos estaba la aguja indicadora y despues deduje que tambien se quitaba el tornillo que ven arriba)
I found it easier to remove the airbox. Remove the three Philips and the 10mm bolt. The throttle screw knob pops off by slipping it backwards. There are two hoses hidden behind the box that slip right off.

El paso anterior no es necesario y tengan cuidado, ya que atras hay otras dos mangueras que hay que quitar y no es asi por asi, ademas cuando lo hice la primera vez le di el torque indicado y no aguanto uno de los tornillos y se sobo la rosca. ademas pueden ocasionar fujas que son peligrosas, en otras palabras soquenla y no lo quiten.

Remove the valve covers. To adjust the front, rotate the crankshaft clockwise and align the “FT” mark on the drive with the index mark. When you are adjusting the valves on the front cylinder, you should be on the "FT" mark. Remove one plug from each cylinder to make it easier to turn the engine. Make sure you are on the compression stroke by grabbing the rocker arms and wiggling them. All three - both intakes and the exhaust should wiggle. If they don’t move, you will need to rotate the crank one full turn. Both intakes and the exhaust are adjusted with the engine in this position. Valves are adjusted with a 10 mm offset box and a 4 mm open end. Specs for the 1300 are: Intake .006 ± .001 and Exhaust is .012 ± .001 INCHES.

I noted a lot of 1800 riders are using these instructions too.....the specs are different for the 1800, they are: Intake .005 ± .001 , Exhaust .013 ± .001 INCHES for the VTX 1800.

If a valve is out of spec, when you loosen it, add a drop or two of engine oil to the adjusting threads and seating surface

Esta es la parte c@#$%a asi que preparense y armense de paciencia, al inicio tomara quiza un par de horas encontrar el punto exacto del gauge. OJO lo tienen que doblar y tener cuidado de no quebrarlo dentro del motor que se cagan en la moto. Tambien ponganle un cordon para evitar que se vaya la herramienta dentro del motor, haganlo solo tomara un minuto.
La clave esta en tomar la medida adecuada, una mas alta y una baja, Cuando tengan la medida adecuada, pasenle la alta y esta tiene que pasar con dificultad o no pasa, luego tomen la baja y esta tiene que pasar muy facilmente. Despues cuando vayan a apretar la tuerca para dejar la medida correcta les recomiendo lo siguiente: introduzcan el gauge mas alto y dejenlo ahi y luego aprieten la tuerca. Esto se los recomiendo ya que es bien sensible esa tuerca y facilmente se mueve cuando lo estamos apretando. Una vez lo aprieten vuelvan a pasar el gauge con la medida correcta para estar seguros. No se les olvide estar en compresion, es decir agarren el rocket y muevanlo, tiene que hacer un ligero tick hacia los lados.

Here is a shot with the “FT” mark aligned with the index to find Top Dead Center on the front cylinder


Align the index mark to the “RT” on the drive to do the rear cylinder. Same specs. Again...all three valves on the rear cylinder (2 intakes and 1 exhaust) are adjusted with the timing mark on "RT".
Ojo, que el ajuste lo tienen que hacer a las valvulas traseras y delanteras, o sea hay dos de una sola valvula y dos de dos valvulas.

Here is a shot with the “RT” mark aligned with the index to find Top Dead Center on the rear cylinder. Remember to be sure you are on the compression stroke by grabbing the rocker arms (all three) and wiggling them.

When you button everything back up, clean off the o-rings and check for nicks or tears. If they are in poor shape, they’ll need to be replaced (my originals are still on). Lubricate all the o-rings with clean engine oil. The exhaust and timing cap threads get a coating of grease.

Torque Values:

(4) Intake cover bolts – 11 lbs/ft

(1) Timing hole cap - 13 lbs/ft

(6) Socket bolts for plasi-chrome cover – 7 lbs/ft

(4) Spark plugs – 10 lbs/ft (Use a small amount of non-copper based anti seize on the threads)

(1) 10mm air cleaner mounting bolt – 7 lbs/ft

(3) Phillips air cleaner screws – 2.9 lbs/ft


Pictured are the tools I used – a 10mm offset box, feeler gauges, and a 4 mm open end. I had to shorten up the .012 so it wouldn’t hit the radiator while doing the front.


I used these offest gauges from Sears....still had to trim to fit. Be sure to remove any burr from trimming them.: http://www.sears.com/sr/javasr/product.do?BV_UseBVCookie=Yes&vertical=TOOL&pid=00940802000&subcat=Automotive+Specialty+Tools


Y eso es todo, otras imagenes que pueden ser de su interes:


La foto anterior es para que tengan una imagen del espacio disponible.


Y eso es todo, siempre se escucha un tick tick tick en el motor y eso es bueno. No es bueno cuando no escuchas nada. Ante la duda SIEMPRE es mejor dejarlas sueltas que apretadas. OJO. si las dejas muy apretadas te puede calentar mucho el motor y quemar el piston.


Listo, dormiran tranquilos sabiendo lo que se le ha hecho a la moto y que lo han dejado bien. Recuerden hacerlo en el compression stroke.


Saturday, January 27, 2007

Removiendo la llanta trasera

Durante el viaje me enfrente al peor de mis temores y fue apenas en Honduras, todavia me faltaba pasar por Nicaragua, CostaRica y Panama... Cambiar la llanta trasera...
Menos mal al dealer se le ocurrio una buena idea. Mi moto tiene los V&H Big Shots, asi que cubre el tornillo principal de la llanta, entonces el dilema es: o remover el escape O "remover los amortiguadores", esa fue una buena idea.. asi que cuando tu remueves los amortiguadores la llanta baja o sube a una posicion en donde es facil remover el tornillo. Ok, hasta aqui con esta idea, espero sirva de algo, luego voy a poner nuevos post sobre como hacerlo paso a paso...

Labels:

Saturday, January 20, 2007

Fusibles Quemados


Maldita luz, despues del viaje a Panama la moto me quedo con problemas ya que por tratar de entrar a un dealer de la Honda para saber donde carajos cambiar el aceite, perdi el control de la moto y fue a parar al suelo; ya se que fue estupidez, pero a quien se le ocurre poner un taller en el cerro de la muerte!!!!. Bueno la cosa es que se golpeo el foco y despues de eso las luces de la lightbar no encendian.
Cuando regrese a El Salvador, me di cuenta que se habia ido el fusible de la lightbar. La lightbar que tiene la mia es la Honda lightbar, un dato muy importante que me di cuenta hasta que ya habia desarmado toda la tontera. Bueno en fin, cuando reemplaze el fusible, inmediatamente se quemo. Cuando le hice un puente se quemo el fusible que va a la caja (el de 10 amp), el numero 3. Fue un completo desmadre, le gaste, el dealer me dijo que era el relay.. y recolecte un monton de informacion... al final cuando el foro de la vtx me dijo y me aseguro que era un corto. desarme toda la tontera para entender de donde podia venir el corto cuando me acorde que el foro tambien habia dicho que tener los focos de distinto voltaje podia perjudicar. Cuando extraje los focos para saber el poder me di cuenta que era distinto, pero eso no era todo.. me preguntaba como es que funcionaban esos malditos focos y fue cuando me di cuenta que solo le llega un cable de energia, y fue ccuando me pregunte y donde hace contacto a tierra??? y era por la carcaza... y la carcaza hacia contacto con el negativo!!!!!. porque la parte de uno de los focos se habia doblado por la caida!!!!!. Todo era reemplazar el bentido foco y ya.

Pero saque un monton de informacion que puede ayudar. y aqui va...

Labels:

Saturday, December 23, 2006

Viaje a Panama


Bueno el viaje a Panamá sucedió sin ningún contratiempo y la moto se comportó como se esperaba y más. Lo único que me detenía eran los policias y el limite de velocidad.
Agregue algunas imagenes en el flickr.

Thursday, August 10, 2006

Solo para que den ganas de sacar la moto

Saturday, July 29, 2006

Especificacion de Torque para la 1300

Despues de una repacion o mantenimiento asegurate aplicarle los valores de torque correspondientes. Aqui tienes los detalles: